# Build instructions
## Source code
The source code for the reference designs is managed on this Github repository:
* [https://github.com/fpgadeveloper/zynqmp-hailo-ai](https://github.com/fpgadeveloper/zynqmp-hailo-ai)
Note that the repository contains submodules, so it is essential to use the `--recursive` option when cloning:
```
git clone --recursive https://github.com/fpgadeveloper/zynqmp-hailo-ai.git
```
## License requirements
The designs for all of the [target boards](supported_carriers) can be built with the Vivado ML Standard
Edition **without a license**.
(target-designs)=
## Target designs
This repo contains several designs that target the various supported development boards and their
FMC connectors. The table below lists the target design name, the camera ports supported by the design and
the FMC connector on which to connect the [RPi Camera FMC].
Note that there are two target designs for the [ZCU106] board: `zcu106` and `zcu106_hpc0`, and the
differences are explained in the table below.
All target designs except `zcu106` require the [M.2 M-key Stack FMC] as the M.2 adapter for the Hailo-8, with the
[RPi Camera FMC] stacked on top of it.
{% for group in data.groups %}
{% set designs_in_group = [] %}
{% for design in data.designs %}
{% if design.group == group.label and design.publish %}
{% set _ = designs_in_group.append(design.label) %}
{% endif %}
{% endfor %}
{% if designs_in_group | length > 0 %}
### {{ group.name }} designs
| Target board | Target design | Cameras | M.2
Active
Slots | FMC Slot | VCU | Stack Design | Vivado
Edition |
|---------------------|-------------------|---------|------------------|-------------|-----|-----|-----|
{% for design in data.designs %}{% if design.group == group.label and design.publish %}| [{{ design.board }}]({{ design.link }}) | `{{ design.label }}` | {{ design.cams | length }} | {{ design.lanes | length }} | {{ design.connector }} | {% if design.vcu %} ✅ {% else %} ❌ {% endif %} | {% if design.stack %} ✅ {% else %} ❌ {% endif %} | {{ "Enterprise" if design.license else "Standard 🆓" }} |
{% endif %}{% endfor %}
{% endif %}
{% endfor %}
#### Notes:
1. The Vivado Edition column indicates which designs are supported by the Vivado *Standard* Edition, the
FREE edition which can be used without a license. Vivado *Enterprise* Edition requires
a license however a 30-day evaluation license is available from the AMD Xilinx Licensing site.
2. The Stack Designs use the [M.2 M-key Stack FMC] with the [RPi Camera FMC] stacked on top of it. The non-stack
designs use the [FPGA Drive FMC Gen4] on one FMC connector, and the [RPi Camera FMC] on another.
3. The `zcu106` target design uses the [FPGA Drive FMC Gen4] as the M.2 adapter for the Hailo-8.
In that design, the [FPGA Drive FMC Gen4] connects to HPC1 while the [RPi Camera FMC] connects
to the HPC0 connector.
4. The `pynqzu` target design has video pipelines for only 2 cameras (CAM1 and CAM2 as
labelled on the RPi Camera FMC). This is due to the resource limitations of the device on this board.
5. The `zcu106_hpc0` and `uzev` target designs have support for 2x M.2 modules. To use the Hailo demo scripts,
at least one of these modules must be the [Hailo-8 M.2 AI Acceleration Module]. The second slot can be used
for a second Hailo module, or an NVMe SSD for storage.
### Stack designs
The "stack" designs are intended to be used with the [RPi Camera FMC] stacked on top of the [M.2 M-key Stack FMC]
as shown in the image below. This setup allows both the [RPi Camera FMC] and the M.2 adapter to be
connected to the carrier board through a single FMC connector.

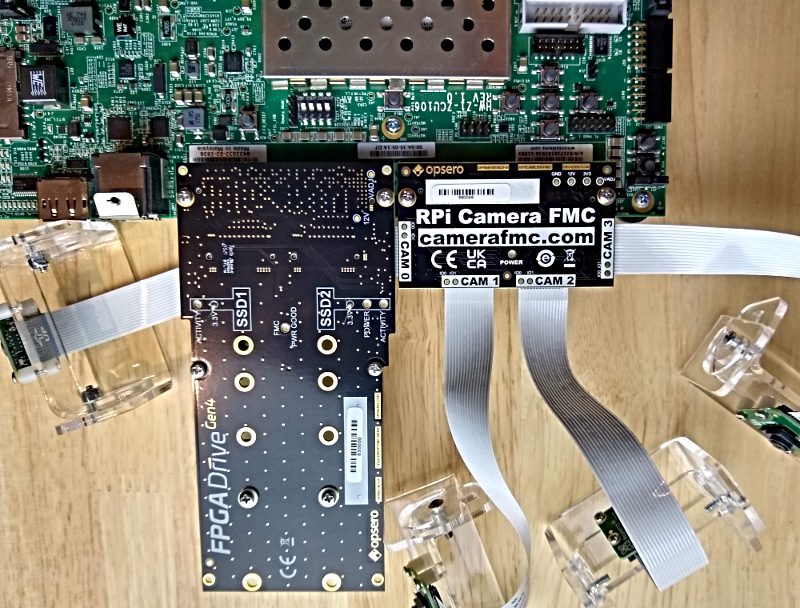
### Non-stack design
The single non-stack design for [ZCU106] (target design `zcu106`) is intended to be used with the [RPi Camera FMC] on connector HPC0 and
the [FPGA Drive FMC Gen4] on connector HPC1 as shown in the image below.
## Linux only
These projects can be built using a machine (either physical or virtual) with one of the
[supported Linux distributions].
```{tip} The build steps can be completed in the order shown below, or
you can go directly to the [build PetaLinux](#build-petalinux-project) instructions below
to build the Vivado and PetaLinux projects with a single command.
```
### Build Vivado project
1. Open a command terminal and launch the setup script for Vivado:
```
source /2025.2/Vivado/settings64.sh
```
2. Clone the Git repository and `cd` into the `Vivado` folder of the repo:
```
git clone --recursive https://github.com/fpgadeveloper/zynqmp-hailo-ai.git
cd zynqmp-hailo-ai/Vivado
```
3. Run make to create the Vivado project for the target board. You must replace `` with a valid
target (alternatively, skip to step 5):
```
make project TARGET=
```
Valid target labels are:
{% for design in data.designs if design.publish %} `{{ design.label }}`{{ ", " if not loop.last else "." }} {% endfor %}
That will create the Vivado project and block design without generating a bitstream or exporting to XSA.
4. Open the generated project in the Vivado GUI and click **Generate Bitstream**. Once the build is
complete, select **File->Export->Export Hardware** and be sure to tick **Include bitstream** and use
the default name and location for the XSA file.
5. Alternatively, you can create the Vivado project, generate the bitstream and export to XSA (steps 3 and 4),
all from a single command:
```
make xsa TARGET=
```
(build-petalinux-project)=
### Build PetaLinux project
These steps will build the PetaLinux project for the target design. You are not required to have built the
Vivado design before following these steps, as the Makefile triggers the Vivado build for the corresponding
design if it has not already been done.
1. Launch the setup script for Vivado (only if you skipped the Vivado build steps above):
```
source /2025.2/Vivado/settings64.sh
```
2. Launch PetaLinux by sourcing the `settings.sh` bash script, eg:
```
source /2025.2/settings.sh
```
3. Build the PetaLinux project for your specific target platform by running the following
command, replacing `` with a valid value from below:
```
cd PetaLinux
make petalinux TARGET=
```
Valid target labels for PetaLinux projects are:
{% for design in data.designs if design.petalinux and design.publish %} `{{ design.label }}`{{ ", " if not loop.last else "." }} {% endfor %}
Note that if you skipped the Vivado build steps above, the Makefile will first generate and
build the Vivado project, and then build the PetaLinux project.
### Build issue and workaround
When building the PetaLinux project, you might experience one or more of the following error messages:
```
ERROR: hailortcli-4.23.0-r0 do_configure: ExecutionError('/home/user/zynqmp-hailo-ai/PetaLinux/zcu106/build/tmp/work/cortexa72-cortexa53-xilinx-linux/hailortcli/4.23.0-r0/temp/run.do_configure.2849196', 1, None, None)
ERROR: Logfile of failure stored in: /home/user/zynqmp-hailo-ai/PetaLinux/zcu106/build/tmp/work/cortexa72-cortexa53-xilinx-linux/hailortcli/4.23.0-r0/temp/log.do_configure.2849196
ERROR: Task (/home/user/zynqmp-hailo-ai/PetaLinux/zcu106/project-spec/meta-user/meta-hailo/meta-hailo-libhailort/recipes-hailo/hailortcli/hailortcli_4.23.0.bb:do_configure) failed with exit code '1'
ERROR: libhailort-4.23.0-r0 do_configure: ExecutionError('/home/user/zynqmp-hailo-ai/PetaLinux/zcu106/build/tmp/work/cortexa72-cortexa53-xilinx-linux/libhailort/4.23.0-r0/temp/run.do_configure.2851680', 1, None, None)
ERROR: Logfile of failure stored in: /home/user/zynqmp-hailo-ai/PetaLinux/zcu106/build/tmp/work/cortexa72-cortexa53-xilinx-linux/libhailort/4.23.0-r0/temp/log.do_configure.2851680
ERROR: Task (/home/user/zynqmp-hailo-ai/PetaLinux/zcu106/project-spec/meta-user/meta-hailo/meta-hailo-libhailort/recipes-hailo/libhailort/libhailort_4.23.0.bb:do_configure) failed with exit code '1'
```
If you open one of the logfiles of those error messages, you will find error messages that are similar to the following:
```
Cloning into 'protobuf-src'...
fatal: unable to access 'https://github.com/protocolbuffers/protobuf.git/': error setting certificate file: /usr/local/oe-sdk-hardcoded-buildpath/sysroots/x86_64-petalinux-linux/etc/ssl/certs/ca-certificates.crt
```
#### Explanation:
In order to build the meta-hailo recipes, PetaLinux needs to clone some repositories.
To do this, it requires a digital certificate that it expects to find at
`/usr/local/oe-sdk-hardcoded-buildpath/sysroots/x86_64-petalinux-linux/etc/ssl/certs/ca-certificates.crt`.
That path is an OpenEmbedded eSDK relocation placeholder that PetaLinux is meant to
patch to the real location at install time, but on PetaLinux 2025.2 the relocation
does not fully fire for the certificate path baked into `git-native`'s libcurl.
This is a PetaLinux/eSDK packaging issue, not a Hailo or `meta-hailo` issue — a
from-source Yocto build does not hit it.
#### Work-around:
Create a symbolic link from the expected path to the host's system CA bundle so
the missing file is resolvable:
```
sudo mkdir -p /usr/local/oe-sdk-hardcoded-buildpath/sysroots/x86_64-petalinux-linux/etc/ssl/certs/
sudo ln -s /etc/ssl/certs/ca-certificates.crt /usr/local/oe-sdk-hardcoded-buildpath/sysroots/x86_64-petalinux-linux/etc/ssl/certs/ca-certificates.crt
```
After running the above commands, re-run the build with
`make clean TARGET=` followed by `make petalinux TARGET=` to
discard the cached failure. `PetaLinux/Makefile` also runs a
`check_ca_workaround` prerequisite target that fails fast with the same
instructions if the symlink has not been applied yet.
### Transient sstate fetch failures
If a `make petalinux TARGET=` run ends with errors like
```
ERROR: --r0 do_..._setscene: Fetcher failure: Unable to find file file://.../sstate:...
[ERROR] Command bitbake petalinux-image-minimal failed
```
the actual build is not broken. These `_setscene` errors come from
bitbake trying to pull prebuilt artifacts from the public Xilinx
sstate-cache mirror, which occasionally returns 404 for individual
packages. Bitbake falls back to building those packages locally and
succeeds, but still exits non-zero because of the failed fetches —
so the Makefile stops before the `petalinux-package` step that
produces `BOOT.BIN`. Re-run the same `make petalinux TARGET=`
command; the second attempt finds the missing packages in the local
sstate cache populated by the first run and completes cleanly.
### PetaLinux offline build
If you need to build the PetaLinux projects offline (without an internet connection), you can
follow these instructions.
1. Download the sstate-cache artefacts from the Xilinx downloads site (the same page where you downloaded
PetaLinux tools). There are four of them:
* aarch64 sstate-cache (for ZynqMP designs)
* arm sstate-cache (for Zynq designs)
* microblaze sstate-cache (for Microblaze designs)
* Downloads (for all designs)
2. Extract the contents of those files to a single location on your hard drive, for this example
we'll say `/home/user/petalinux-sstate`. That should leave you with the following directory
structure:
```
/home/user/petalinux-sstate
+--- aarch64
+--- arm
+--- downloads
+--- microblaze
```
3. Create a text file called `offline.txt` in the `PetaLinux` directory of the project repository. The file should contain
a single line of text specifying the path where you extracted the sstate-cache files. In this example, the contents of
the file would be:
```
/home/user/petalinux-sstate
```
It is important that the file contain only one line and that the path is written with NO TRAILING
FORWARD SLASH.
Now when you use `make` to build the PetaLinux projects, they will be configured for offline build.
[supported Linux distributions]: https://docs.amd.com/r/en-US/ug1144-petalinux-tools-reference-guide/Setting-Up-Your-Environment
[M.2 M-key Stack FMC]: https://docs.opsero.com/op073/datasheet/overview/
[FPGA Drive FMC Gen4]: https://docs.opsero.com/op063/datasheet/overview/
[RPi Camera FMC]: https://docs.opsero.com/op068/datasheet/overview/
[ZCU106]: https://www.xilinx.com/zcu106